Layer 3 Registration Configuration
Configure the port2 registration interface, create a registration DHCP scope and lease pool, and verify the return route to the registration VLAN.
Demo guide — not a tested configuration
On this page
Before you begin
Confirm each prerequisite before planning changes. Checklist progress is kept for this visit and resets when you reload.
Overview
The basic appliance deployment gives you management access through port1. This guide adds the port2 services used by a routed registration network: an interface address for FortiNAC, a DHCP scope for registration clients, and a return route to their VLAN.
The example applies to a single combined Control/Application server running FortiNAC-F 7.6.7. It prepares IPv4 registration networking. Portal appearance, certificates, authentication workflows and the policies that move devices into registration remain separate configuration tasks.
Understand the registration network
The registration clients and FortiNAC port2 are on different subnets. The router or firewall on the registration VLAN relays client DHCP requests to the FortiNAC port2 service address. FortiNAC then uses the scope to allocate a client address and supplies the registration network settings.
This guide configures the FortiNAC side of that arrangement. Complete the basic VMware deployment and management configuration first, and prepare the port2 adapter, routing, firewall access, DHCP relay and required interface services before testing a client lease. The linked Preparation and Appliance Installation guides cover the earlier deployment work.
Example addressing
| Setting | Screenshot example | Meaning |
|---|---|---|
| port1 management address | 192.168.98.12 | Existing Admin UI address |
| port2 registration service address | 192.168.112.2 | FortiNAC address on the service subnet |
| port2 gateway | 192.168.112.1 | Router/firewall address on the port2 subnet |
| port2 mask | 255.255.255.0 | Mask of the port2 service subnet |
| Registration VLAN network | 172.16.21.0/24 | Remote client subnet |
| Registration client gateway | 172.16.21.1 | Default gateway given to registration clients |
| Registration scope label | bh-reg | Name of this scope |
| Registration scope domain | reg.bachhansen.local | Domain shown in the screenshots |
| DHCP lease range | 172.16.21.2–172.16.21.254 | Available registration client addresses |
Registration domain
.local domain. Fortinet warns that this suffix can cause communication issues with agents on macOS, iOS, and some Linux systems. Choose an appropriate registration domain for your environment and review the scope-domain guidance in the references below.Select the Layer 3 network type
The Layer 3 network option is for a routed design in which registration clients reach FortiNAC through a router, rather than sharing the port2 service subnet. It matches the separate service network and registration VLAN described above.
Sign in with the administrator account created during deployment and open System → Config Wizard. In Basic Network, find Network Type and select Layer 3 network. Keep the existing port1 management, DNS and time settings; this change prepares the registration design without replacing your management addressing.
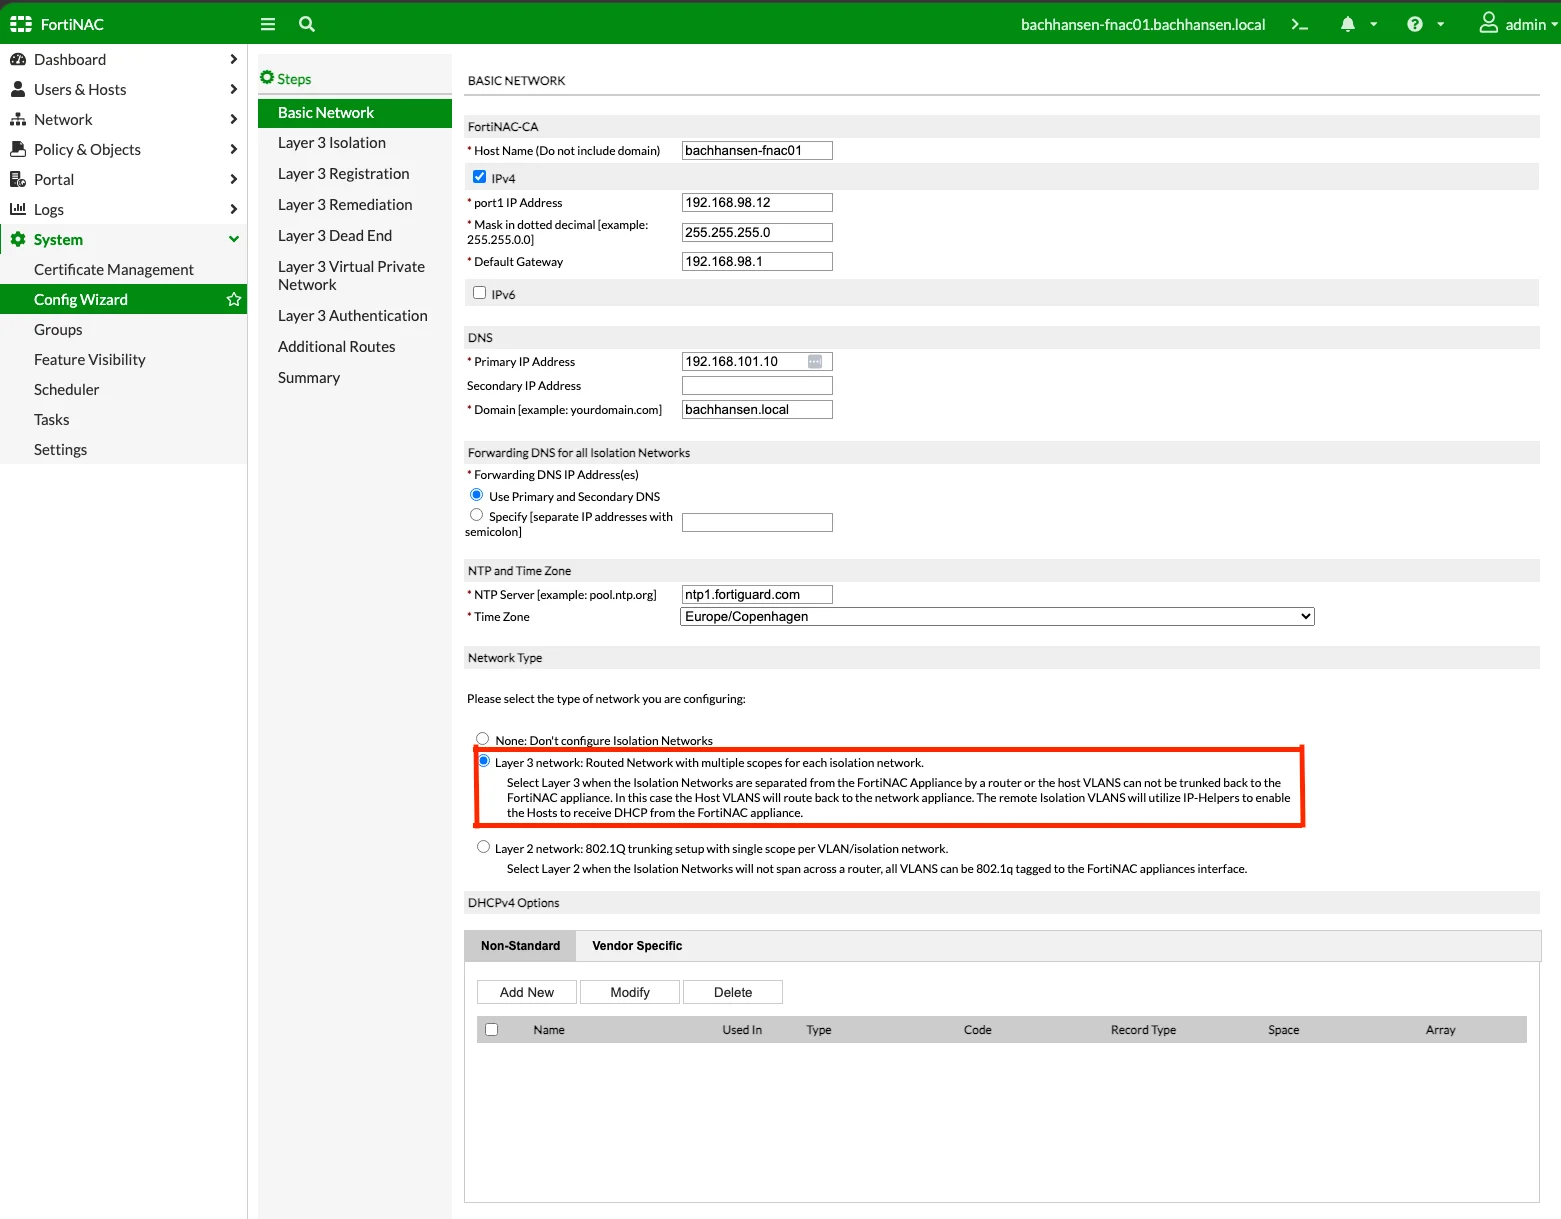
Choose Next to continue to the Layer 3 configuration pages. The registration interface and client scope are configured in Layer 3 Registration.
Configure the registration service interface
The registration interface is FortiNAC’s endpoint on the port2 service subnet. It is the address used as the DHCP relay destination in this design. Registration clients receive addresses from their own routed subnet; they do not receive addresses from the port2 service subnet.
Open Layer 3 Registration in the wizard’s Steps panel and enable Registration Interface port2. The unconfigured page shows the interface settings above the registration scope list.
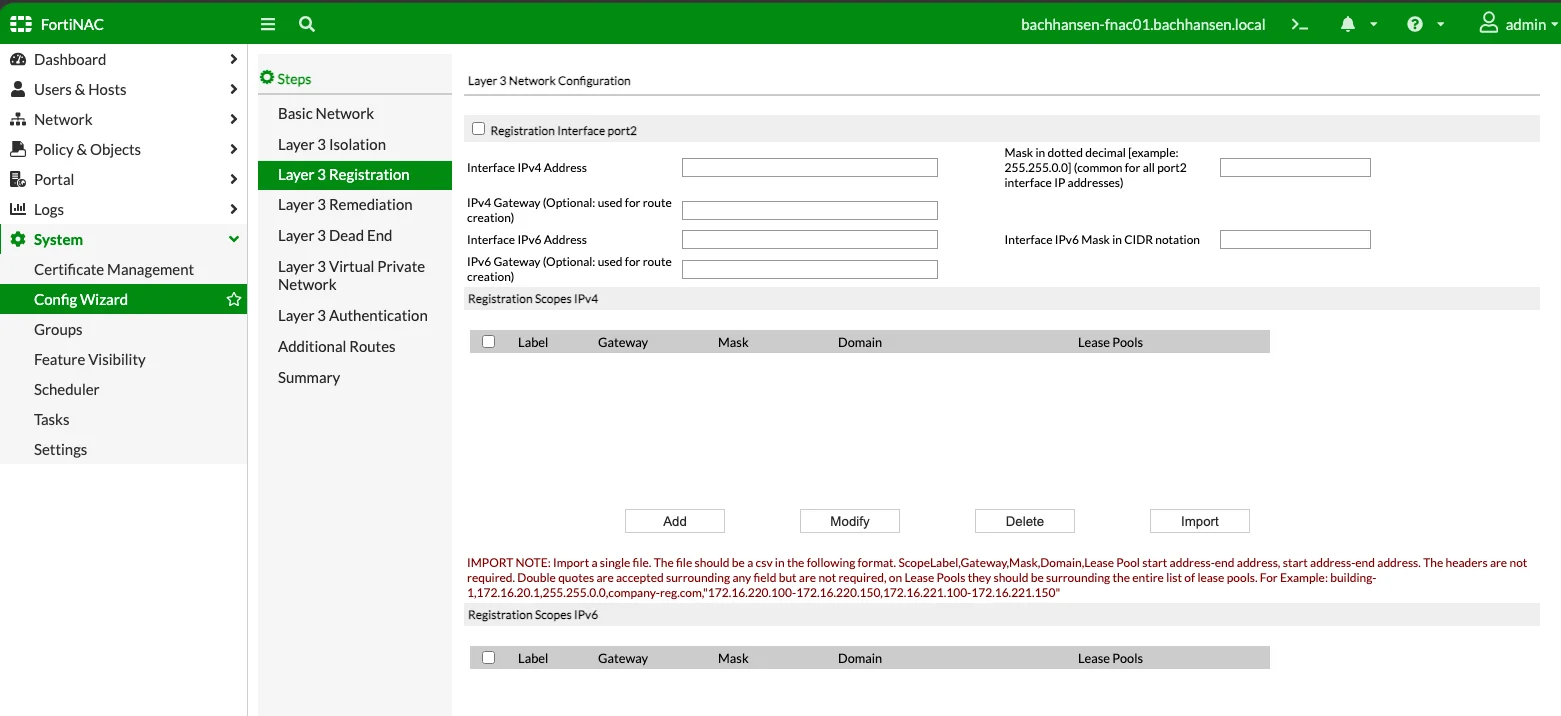
Set Interface IPv4 Address to 192.168.112.2 and Mask in dotted decimal to 255.255.255.0. These values place FortiNAC on the service subnet. Enter 192.168.112.1 in IPv4 Gateway: this is the router or firewall on the same subnet as port2.
The wizard labels IPv4 Gateway as optional and used for route creation. This routed example supplies it so FortiNAC can return traffic to the remote registration subnet through port2. The registration client gateway, 172.16.21.1, belongs in the client scope; it is not the port2 gateway.
Define the registration scope and address pool
A registration scope describes the client network that FortiNAC serves. Its gateway and mask describe the registration VLAN, while its lease pool defines the client addresses available on that network. Keeping these settings separate from the port2 interface prevents clients from receiving the service network’s gateway.
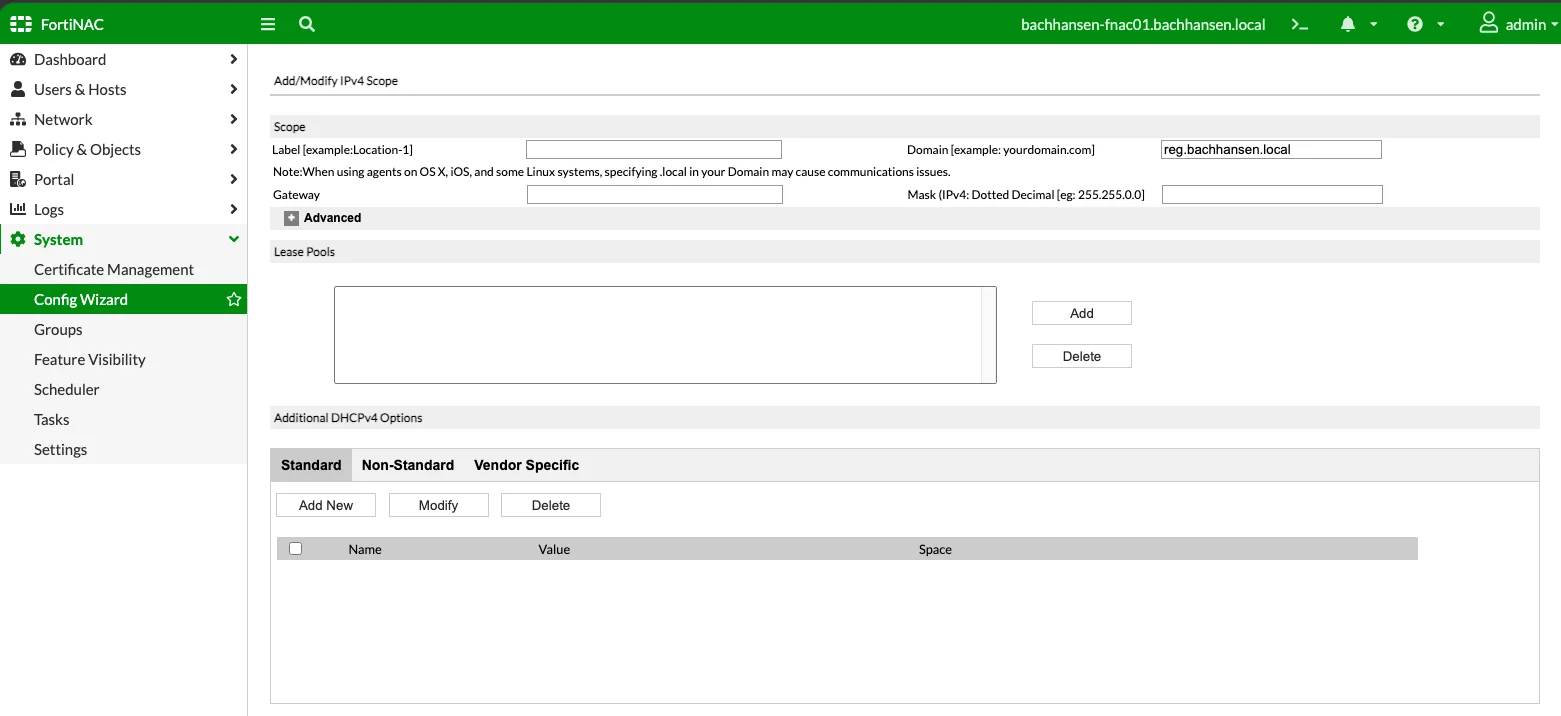
Under Registration Scopes IPv4, choose Add to open the scope form. Use Label to give the scope a recognizable name and Domain for the registration domain. The screenshot example uses bh-reg and reg.bachhansen.local; review the domain caution above before selecting a name for your environment.
Enter 172.16.21.1 in the scope’s Gateway field and 255.255.255.0 in Mask. This gateway is on the registration client subnet. It differs from the 192.168.112.1 gateway used by the FortiNAC port2 interface.
Scope naming
REG_, REM_, AUTH_, DE_, ISOL_, VPN_, and HUB_.The Lease Pools area controls which addresses can be allocated to clients. Choose Add, enter a start address of 172.16.21.2 and an end address of 172.16.21.254, then choose Add to save the range. Use only available addresses within the registration subnet, excluding its gateway and any reserved addresses.
Choose Apply in the scope form to save the scope and return to Layer 3 Registration. The completed entry should show the intended label, client gateway, mask, domain and lease range. The screenshot below shows the saved scope alongside the enabled port2 interface.
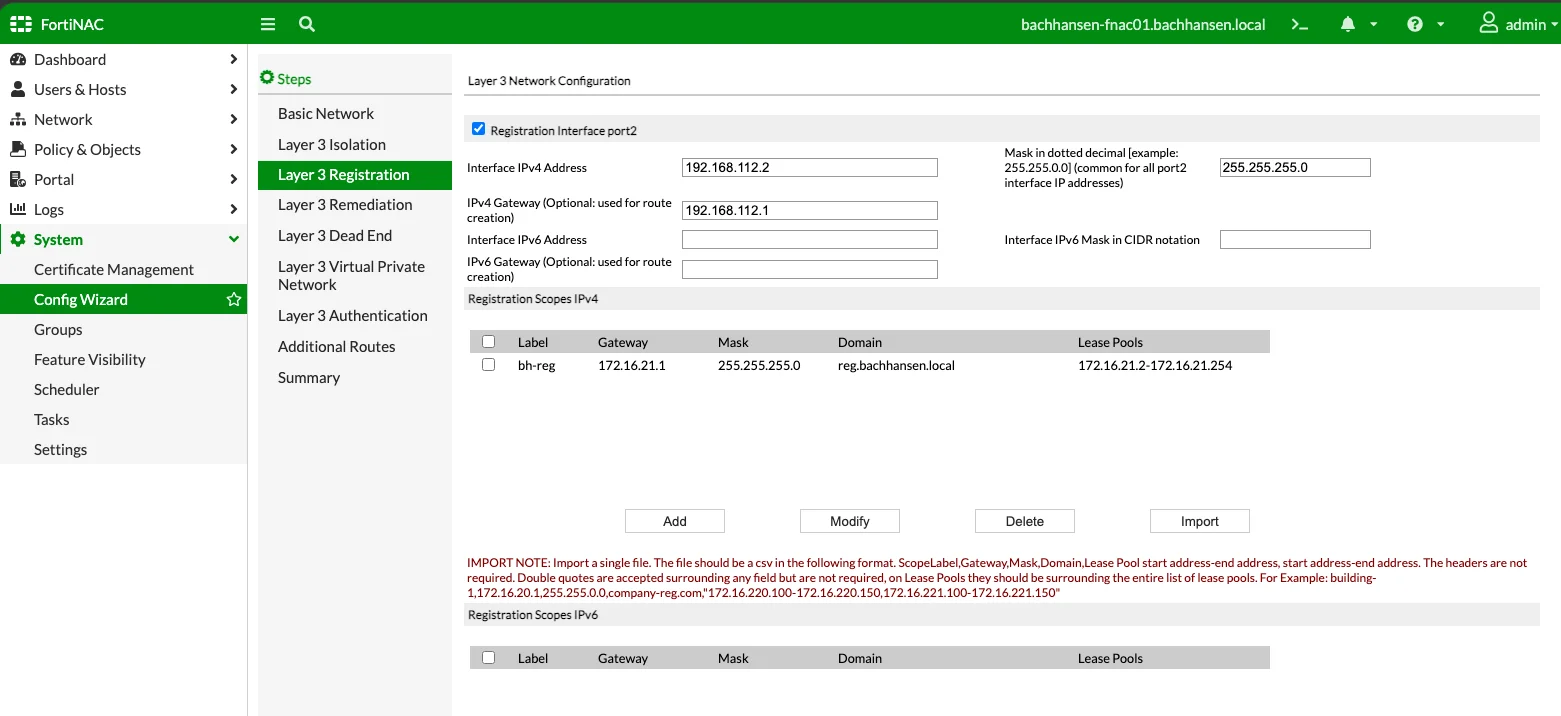
Saving a scope does not apply the complete wizard configuration. The final Summary → Apply operation is still required after you review the return route.
Check the return route
Registration requests arrive through port2, so FortiNAC needs a return path to the remote client subnet through the port2-side router. Otherwise, replies can follow the management default gateway instead of returning through the service network.
Open Additional Routes in the wizard’s Steps panel. Look for a route to the registration subnet, using the gateway on the FortiNAC port2 subnet. The example below routes 172.16.21.0/24 through 192.168.112.1.
| Route field | Example |
|---|---|
| Destination network | 172.16.21.0 |
| Subnet mask | 255.255.255.0 |
| Gateway / next hop | 192.168.112.1 |
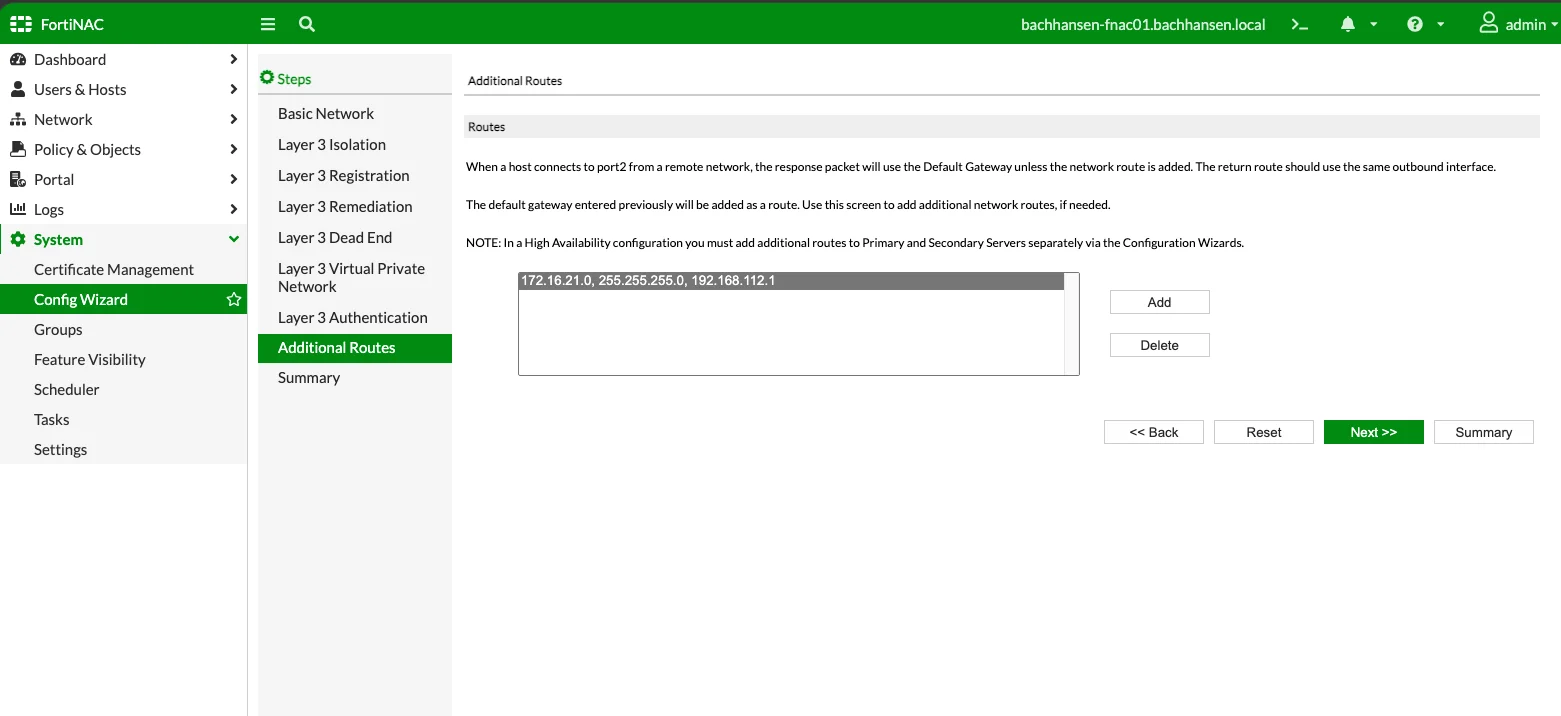
The destination is 172.16.21.0, not the client gateway address. The next hop is 192.168.112.1, not FortiNAC’s own 192.168.112.2 address. The next hop must be reachable on the service subnet so it can forward replies to the registration network.
Scope configuration can create this route automatically. If it is missing, choose Add, enter the destination network, mask and port2 gateway shown above, then save the entry. Review the resulting route list before applying the wizard.
Preserve existing routes
Apply the network configuration
The interface, scope and route settings now need to be committed together. Open Summary and review the port2 address, registration scope, lease pool and return route against your addressing plan. Choose Apply when those values are correct.
Allow the wizard to finish applying the configuration, then review its results for errors or warnings. Resolve any reported errors before using the wizard’s Reboot action. Reboot completes this stage of the appliance configuration.
After startup finishes, reconnect to the Admin UI through port1 using the administrator credentials created during deployment. Management access remains the way to continue configuration; the new registration interface serves the separate client network.
Validate registration network configuration
Check both sides of the configuration: management access through port1, and registration services through port2. Once the registration VLAN, relay and firewall access are prepared, use a client on that VLAN to confirm that it receives a lease from the configured pool, with the intended client gateway and registration domain. Use the expected results below to separate a successful management login from a successful registration-network test.
| Check | Expected result |
|---|---|
| Management access | Admin UI remains reachable through port1 |
| Registration interface | port2 uses the intended address and mask |
| Registration scope | Correct client gateway, domain, mask, and lease range are present |
| Return route | Registration subnet routes through the port2-side gateway |
| Test client, with relay and access prepared | Receives a lease from the registration pool and the intended gateway/domain |
Completing this guide establishes the Layer 3 registration network configuration. Portal presentation, certificates, authentication, and policies that place devices into registration are subsequent configuration tasks.
References
Fortinet – Configuration Wizard overview ↗
Fortinet – Additional Routes ↗
The shared Fortinet 7.6 documentation is published under 7.6.0. The supplied screenshots provide the UI examples used throughout this guide.
Verify the result
Use observed results to decide whether the intended outcome has been achieved.
Expected result
If it isn’t working
If a client receives no lease, check its VLAN, the DHCP relay target, port2 DHCP access, firewall policies, and the saved pool. If replies take the wrong path, check the destination subnet and next hop in Additional Routes.
Change one variable at a time
Video walkthrough
The written guide stands on its own. A companion video can be added after the guide is validated.